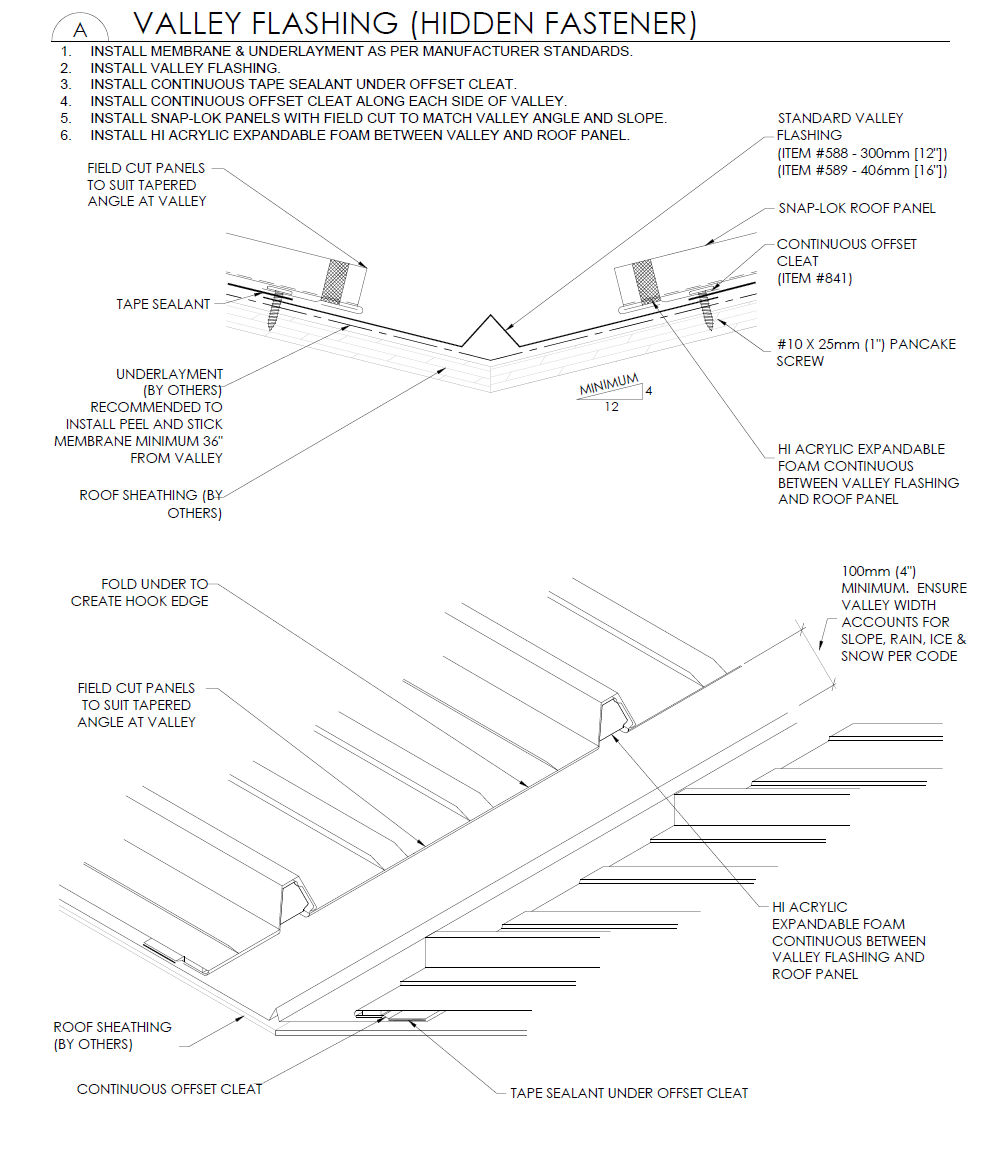
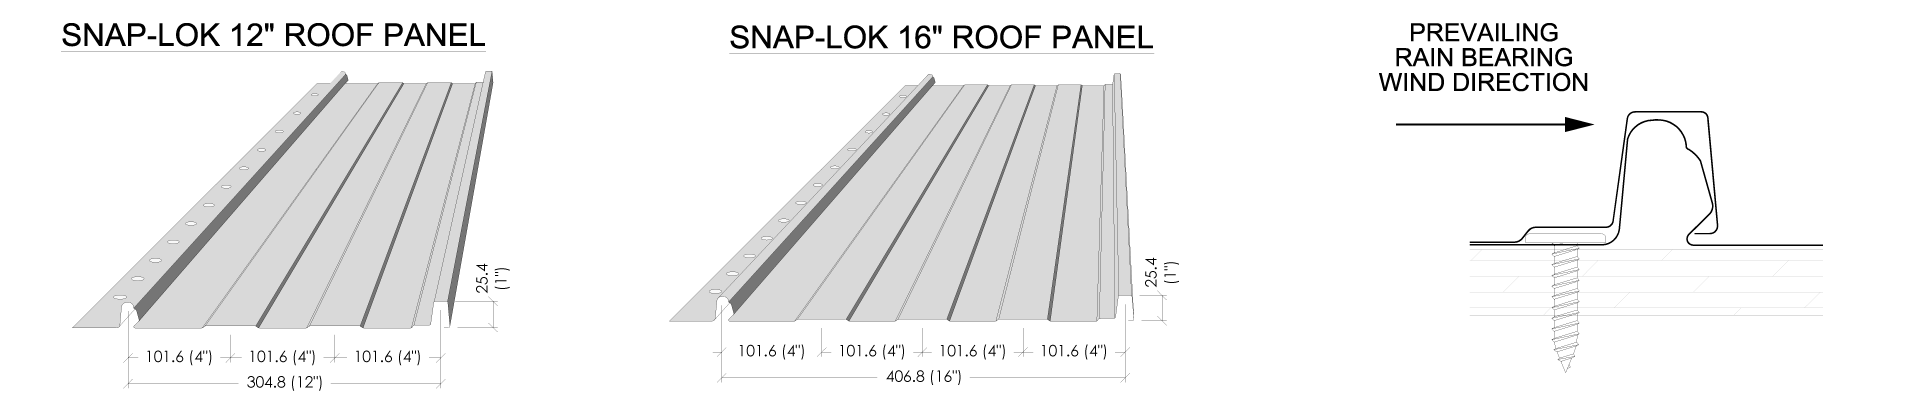
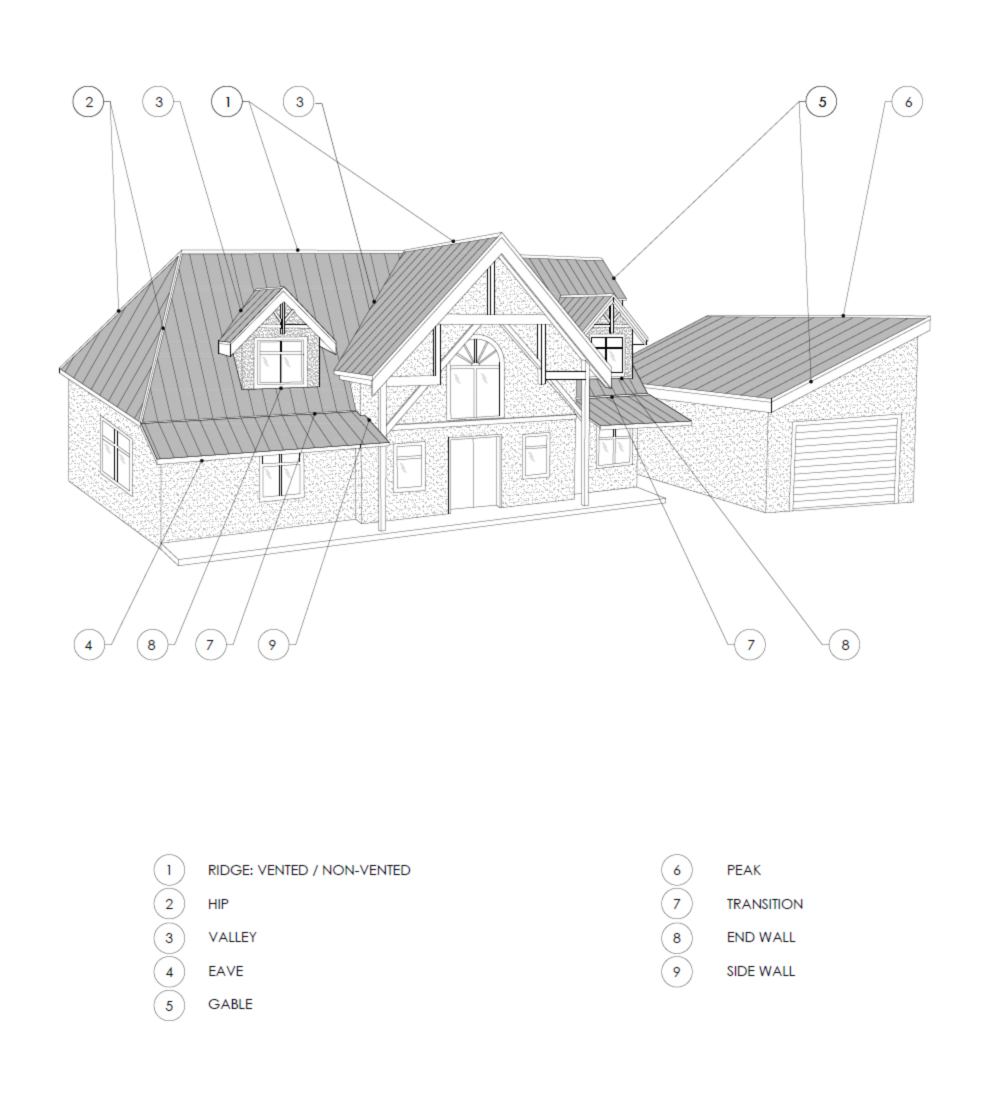
Snap-Lok Roofing Panel
Description of Panel
- The snap-lok roofing panel is a concealed fastener roof system that offers a clean, durable finish to any roof.
- It is intended to be installed over a solid substrate and is not designed to span between unsupported strapping or purlins.
- Available in both 12" and 16" wide profiles.
- Available in 26 and 24 ga. steel thickness.
- Cut to size lengths from 3' (914mm) to 48' (14630mm).
- 16 standard colours.
- Steel sheets are prepainted galvalume or bare galvalume and have the longest life of any roofing sheet available.
- Prepainted products are backed by finish warranty for 40 years against peeling and 30 years for chalk and fade.
- Bare galvalume products are backed by performance warranty for 20 years
See Westman Steel warranty for complete details
THE STEEL USED TO MANUFACTURE SNAP-LOK SHEETS, MEETS OR EXCEEDS THE FOLLOWING SPECIFICATIONS AND REFERENCE STANDARDS:
ASTM A792/A792M,5 5% Aluminum-Zinc Alloy-Coated (Galvalume) Steel Sheet with coating designation AZM150 [AZ50] for Painted Galvalume and Plain Galvalume sheets.
ASTM A653/A653M, Zinc-Coated (Galvanized) Steel Sheet with coating designation Z275 [G90] for Plain Galvanized sheets.
CSSBI 20M-17, Standard for Sheet Steel Cladding for Architectural, Industrial and Commercial Building Applications.
CSSBI 22M-17, Standard for Residential Steel Roofing.
CSSBI S8-2008, Quality and Performance Specification for Prefinished Sheet Steel Used for Building Products.
CSA-S136-16, North American Specification for the Design of Cold-Formed Steel Structural Members.
Description of Installation Guide
This Snap-Lok Roofing Panel Installation Guide is intended for the homeowner, contractor and metal roof installer. This is a general guide covering basic installation details and does not address all conditions or roof designs. It is to be used for general information and not to replace advice by skilled and experienced installers. Please read and understand the guides content before beginning your roof installation in order to ensure a trouble-free installation and maintain applicable warranties. If you have any questions regarding the installation of your metal roof system, please contact Westman Steel.
Disclaimer
By using this Guide, you accept the risks and responsibilities for all losses, damages, costs and other consequences resulting directly or indirectly from using this Guide. These installation instructions are intended as guidelines only . Westman Steel assumes no responsibility for the performance or quality of the roof system installation, nor any personal injury or damage that might occur as a result of improper installation.
Westman Steel does not warrant any product or material as meeting the current building codes, laws or regulations of any particular jurisdiction or local municipality. This guide contains suggestions and guidelines on how to install Westman Steel Snap-Lok roof panels and trim details. The contents of this document include the guidelines that were in effect at the time this publication was originally printed. In an effort to keep pace with the ever-changing code environment, Westman Steel reserves the right to modify, without notice, any specifications and/or designs at any time without incurring any obligations. To ensure you have the latest information available, please inquire or visit our web site. Application and design details are for illustrative purposes only and may not be appropriate for all environmental conditions and/or building designs. Projects should be engineered and installed to conform to applicable building codes, regulations, and accepted industry practices.
All dimensions must be verified by field measurements prior to ordering materials.
Snap-Lok roof panels are recommended to be applied on a minimum roof pitch of 3:12 or greater for concealed eaves and trims. For roof pitch less than 3:12, please contact Westman Steel for products designed for lower slopes.
Due to the various methods of providing proper ventilation for attics and crawl spaces, ventilation and condensation considerations can not be fully addressed and are out of the scope of this guide. Oil canning is an aesthetic phenomenon inherent to light gauge cold formed sheet metal and is characterized by a distortion or waviness of flat surfaces of metal roofing and siding products. As oil canning is an aesthetic issue and does not affect product strength or performance, it is not a cause for rejection. There are several factors that influence this behavior, such as sheet metal thickness, dimensions, installation and system design among others. Oil canning can be minimized by considering these factors mentioned above. See Canadian Sheet Steel Building Institute (CSSBI) - Fact Sheet 13.
Safety Considerations
Always wear proper personal safety equipment when working with metal roofing panels and trims. Westman Steel recommends eye protection, ear protection, gloves and fall protection when working with sheet metal roofing products. Check with local safety authorities for requirements regarding guards, fall protection and other safe working procedures.
Avoid working with metal panels on windy days.
Do not walk on the panels until they have been completely fastened to the substrate. Do not step on panel ribs. Metal surfaces can be extremely slippery when wet or covered with frost. Always ensure proper fall protection procedures and equipment are used. Avoid working on wet or snow-covered roofs. Wear soft rubber-soled shoes when walking on a metal roof to avoid damaging the finish.
Marking
Common graphite or 'lead' pencils must not be used to mark panels or flashing cut marks, as the graphite will cause corrosive action when exposed to moisture. This can lead to premature corrosion and or surface damage.
Cutting
Steel roofing panels may be cut with metal snips, power or hand shears or nibblers. Circular saws with metal cutting blades are acceptable. Do not use abrasive blades, as they can burn both the paint and zinc coating leading to premature wear at these areas.
When cutting panels, turn the panels painted face down and cut in a location away from other panels to avoid metal particles embedding in the painted face of nearby panels. Always remove metal particles from drilling or cutting immediately to avoid damaging the paint finish. Particles, if left on the panel surface can rust overnight. Sheet metal edges are very sharp. Always wear eye protection and gloves when handling or cutting metal sheets. Do not stack cut panels.
Receiving / Handling
Check the delivery of metal roof panels and accessories for quantities and/or damage immediately upon receipt. Note any damage or shortages at the time of delivery. All errors/omissions must be reported within 30 days. Handle panel bundles and individual panels with care to avoid damage. Generally, Westman Steel recommends that supports are to be located at no more than 10 feet from each other to provide adequate support from buckling or bending.
Do not drag sheets on the ground or over each other. Obtain the help of others to transport longer individual panels.
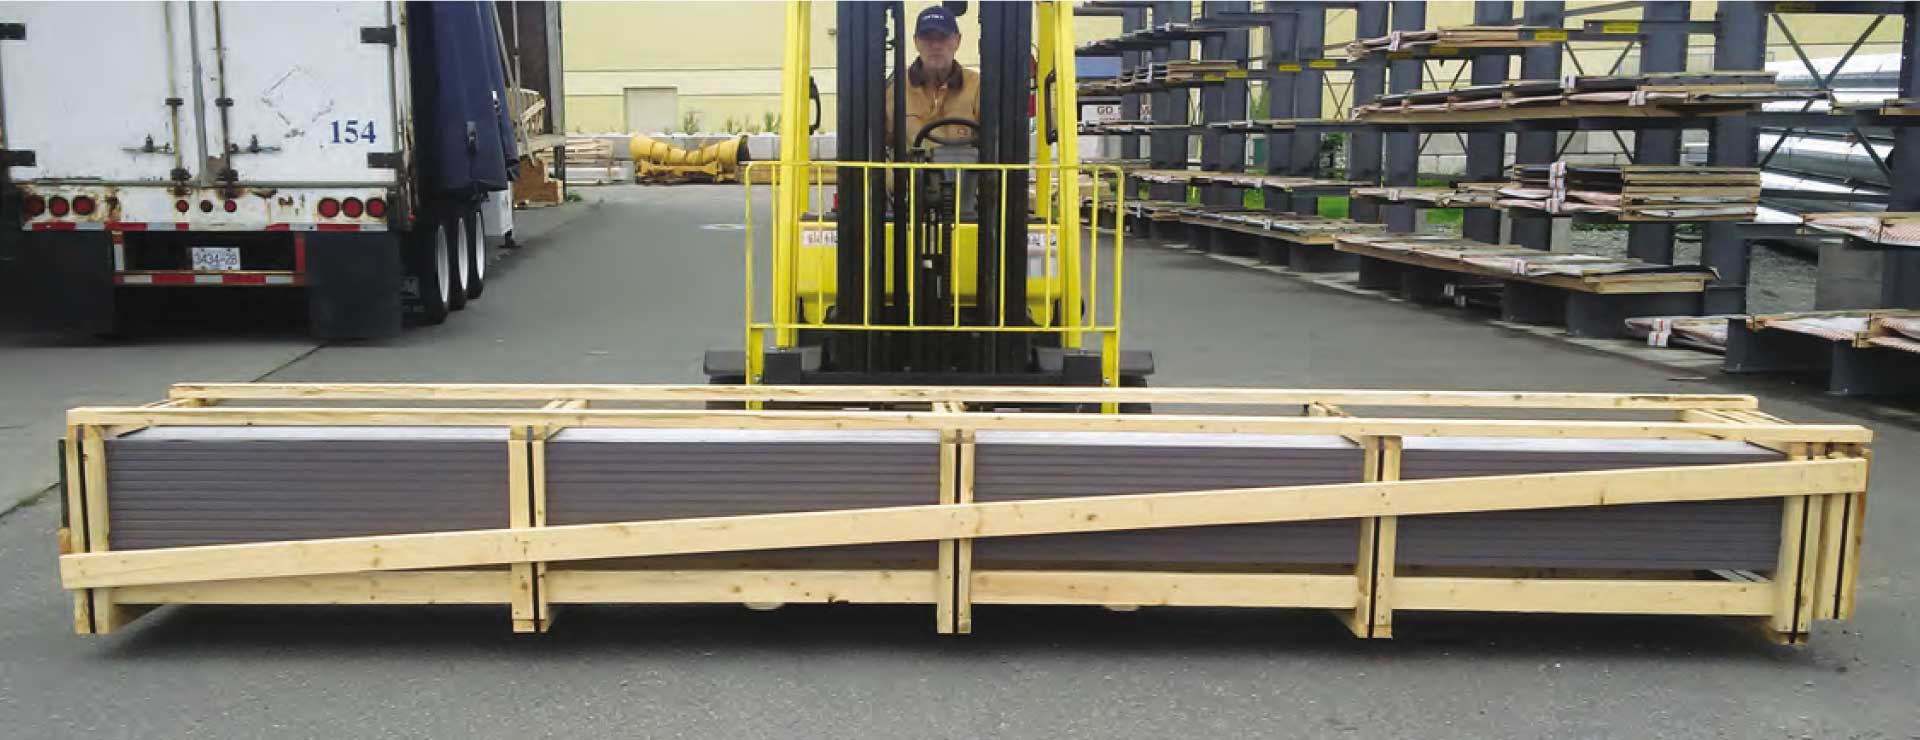
SPREAD FORKS EVENLY UNDER THE BUNDLE
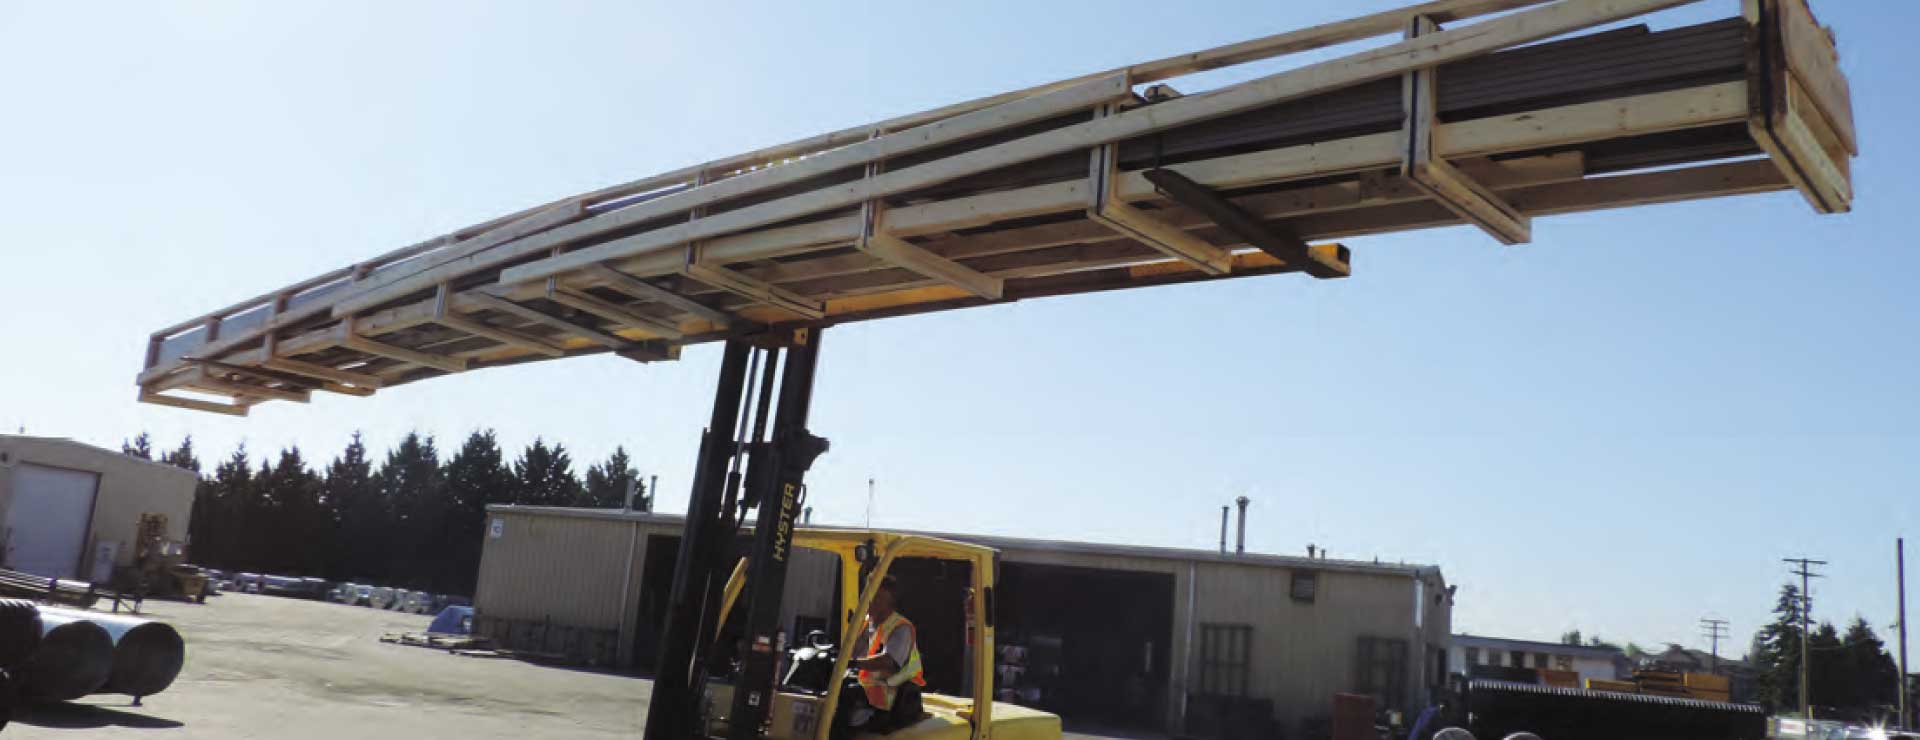
USE SPREADER BAR WITH CRANE
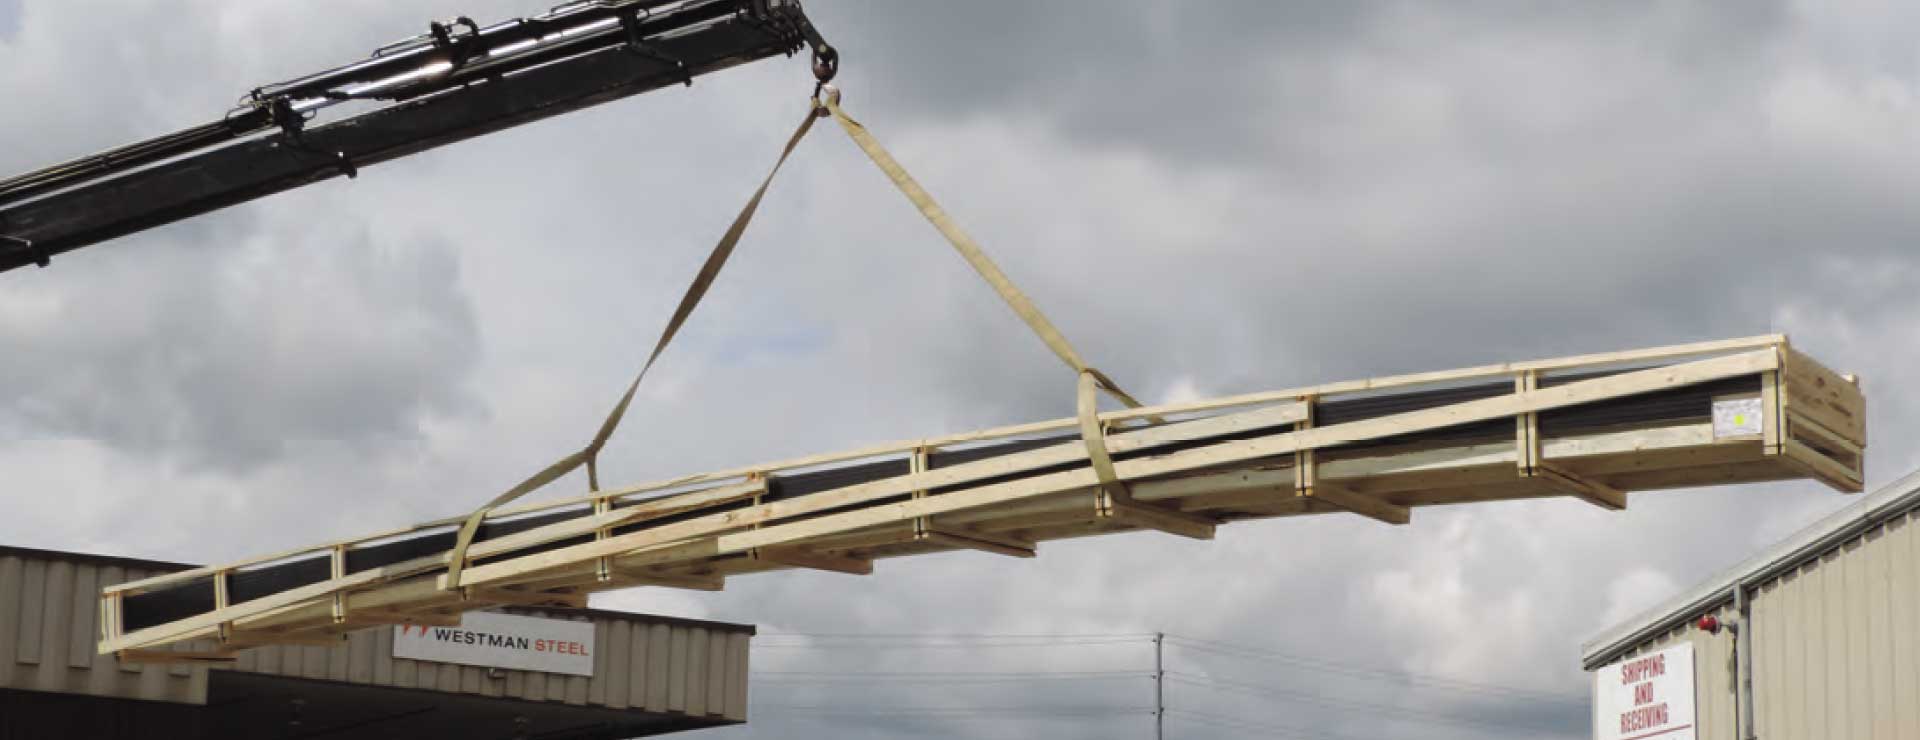
CORRECT CABLE LIFT
Storage
It is important to properly store bundles on site. Storage time must be minimized by installing panels as soon as possible after delivery. Rain or condensation can be drawn between the stacked sheets where it can cause premature failure of the protective coating. Do not store panels in contact with the ground and keep away from chemically aggressive substances (e.g., salt, cement, fertilizer). Ensure the panels are adequately supported and elevated off the ground, with a slope to allow water to drain. Cover panels with a waterproof cover spaced off the panels to allow air movement but prevents wind driven rain penetration. If storing for an extended period, store panels inside or under-roof in a cool, dry and well-ventilated area.
RAISE ONE END TO DRAIN MOISTURE AND COVER WITH WATERPROOF TARP ALLOWING AIR TO CIRCULATE THROUGH THE BUNDLE.
Tools / Equipment Required
- Metal shears, nibblers, power shears or circular saw with metal-cutting cutting blade. Note: Saw cut edges can be jagged, unsightly and tend to rust sooner than sheared edges. Hot metal filings are produced when saw cutting, which may embed in and damage the paint coating. Also, saw cutting burns the paint and galvanizing treatment, leading to the onset of edge rust.
- Metal snips (left edge, right edge and centerline cutting snips).
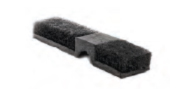
- Hem bending tool (see image).
- Gloves and protective clothing.
- Safety goggles and ear plugs (Eye and ear protection).
- Tape measure and chalk line.
- Rubber mallet.
- Screw gun or drill (adjustable clutch recommended) – see CSSBI Fact sheet 42 in for more information on recommended types of screw guns.
- 1/4” and 5/16” sockets – must be lobular and replaced after 10,000 to 15,000 fasteners.
- Drill bits, screw bits.
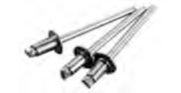
- Pop rivet gun.
- Caulking gun.
- Pencils and markers.
- Utility knife.
- Locking sheet metal pliers.
- Hammer staplers.
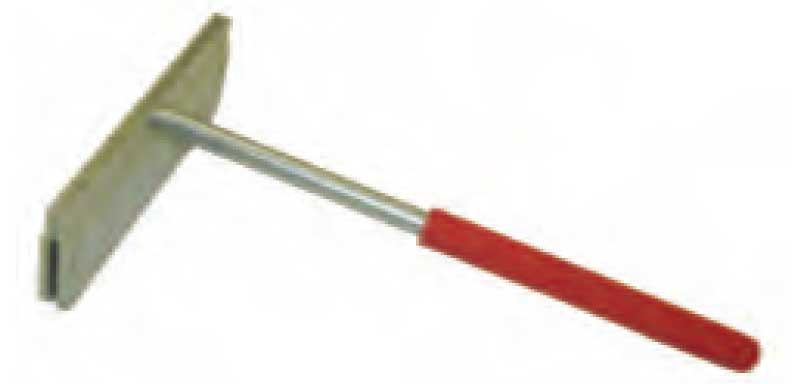
HEM BENDING TOOL3
Solar Panel and Snow Retention Installation
Solar panel or photovoltaic arrays can be easily installed on metal standing seam roof panels including Snap-Lok panels, using a clamp and bracket system that does not penetrate the metal roof. These clamp systems have been tested and engineered based on our profile and gauges.
Snow Retention or snow stop systems can use the same non-penetrating clamp system incorporating either a single or double pipe, rail and fence systems to manage snow. These systems can also use colour matched snow fences to blend in with the roof colour.
Snow blocks or snowshoe style systems and kits are molded from a tough polycarbonate polymer that can withstand heavy impacts at low temperatures. These products are attached to the roof panels using translucent DuraSil™ adhesive provided in every kit, so no screws or mechanical fasteners are required.
For additional information on attachment of solar and snow systems, please contact your local Westman Steel branch.
Skylights and Chimneys
Skylights can be incorporated with metal roofs with proper planning and details provided by the skylight manufacturers. Westman Steel provides a range of custom flashings and trims to accommodate various curb heights and dimensions.
Chimneys that are on the downslope must have a site formed metal saddle or sheet flashing to shed water past the chimney. Westman Steel can provide flat steel sheet material to match roof colour and gauge for site formed crickets and curbs.
Field Paint Touch-up
Painting over a new installation is not recommended. Keep touch-up painting to a minimum as touch-up paint will not last as long as the original factory finish. Use a small artist's brush or a small air brush to apply paint. See CSSBI Fact Sheet 4: Painting of Prefinished Sheet Steel.
Replace a panel rather than attempt to touch-up large areas; a spot 20 mm (3/4") in diameter will become more prominent in time.
Maintenance and Cleaning
Thoroughly clean up after completion of and during construction to remove all debris, metal filings, metal fines, etc. from walls and roofs.
In areas where heavy dirt deposits are present, clean the surface with a solution of water and detergent: 100 ml (1/3 cup) of typical laundry powder detergent per 4 litres (1 gallon) of water. A soft bristle brush can be used with light scrubbing followed by a clean water rinse.
Solvents and abrasive cleaners must be avoided. Caulking compounds, oils, grease, tars, wax and similar substances can be removed with mineral spirits applied only to the affected areas. Detergent cleaning and thorough clean water rinsing should follow the use of mineral spirits.
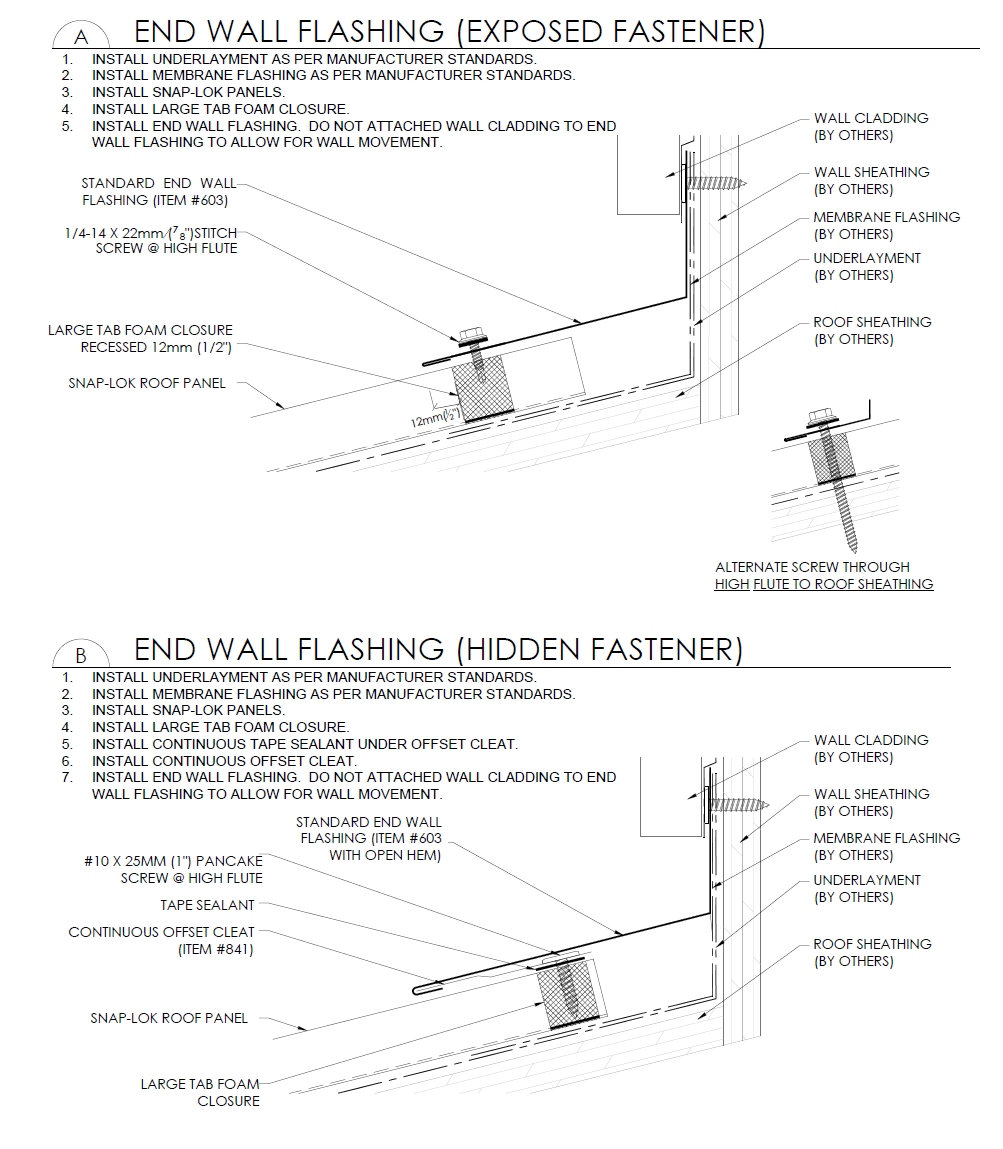
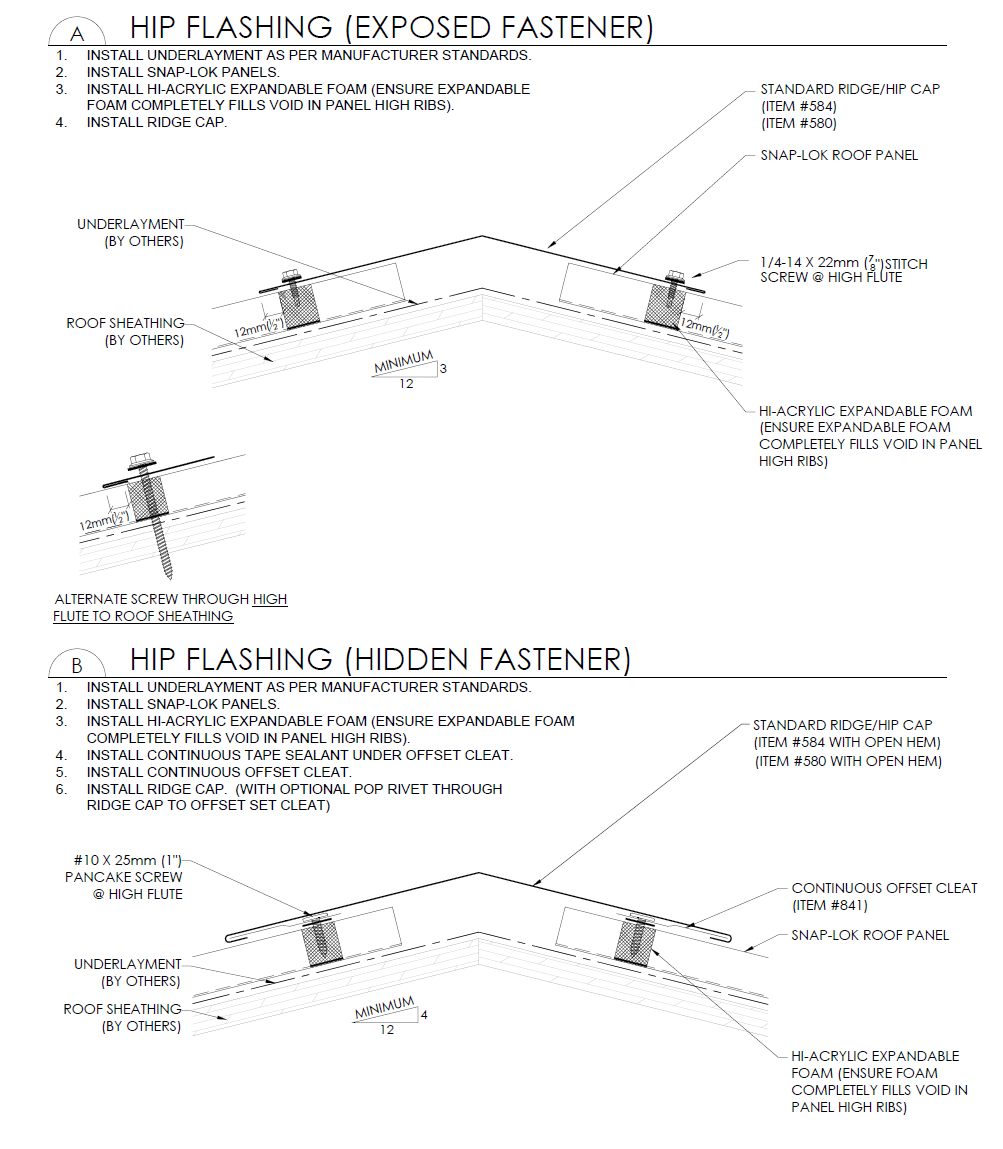
Fastening
To secure the metal roof installation, the following fasteners are used in wood-frame construction:
|
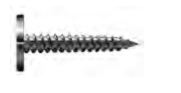
#10 x 1” Pancake head wood screws For attaching roof panels and concealed fastener coverings. |
|
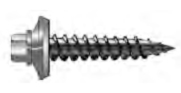
#10 Hex head wood screw with self-sealing washer, various lengths available Self-sealing screw used for fastening flashings. |

|
#14 x 7/8” Stitch screw with self-sealing washer Used to anchor the flashings metal to metal. |
|
Stainless steel pop rivets (optional) Used to connect flashing to flashing corners and lap joints. |
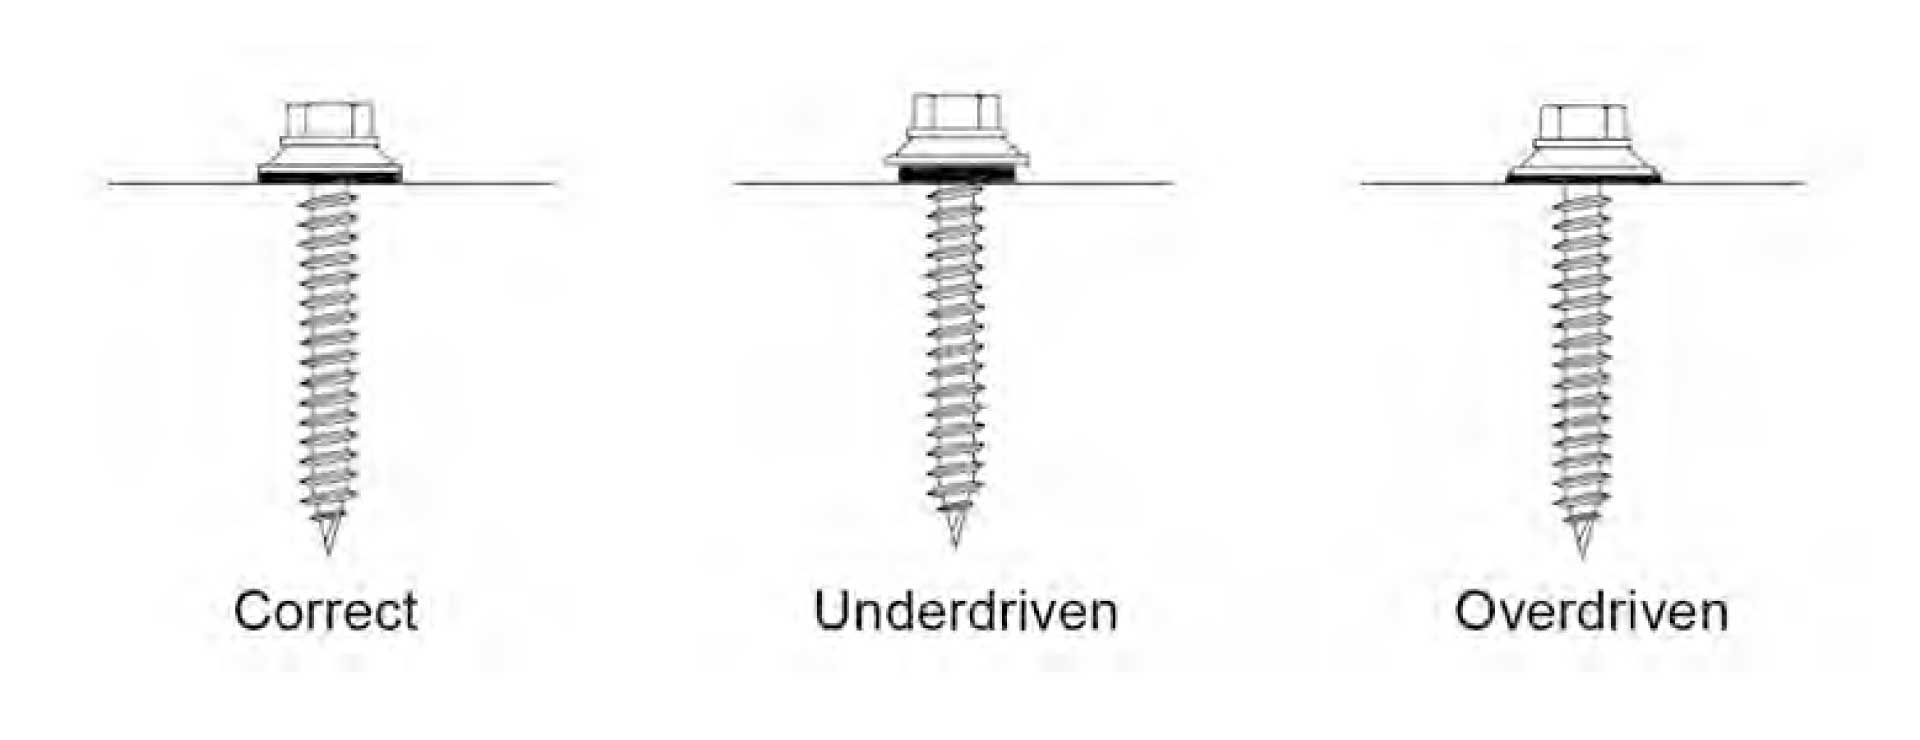
Fasteners must be properly driven to ensure proper seal and strength and provide allowance for expansion and contraction. See the diagram below for proper sheet metal screw fastening.
The Snap-Lok panel utilizes a concealed fastener system. One edge of the panel contains a punched flange to accept fasteners, while the other side snaps onto the rib of the adjacent panel. Panel fastening requirements differ based on geographic region, local weather characteristics and building codes. Wind forces on roofs are greatest at the corners and edges. Recommended pancake head fastener spacing for Snap-Lok panels is 15-1/2” (394mm).
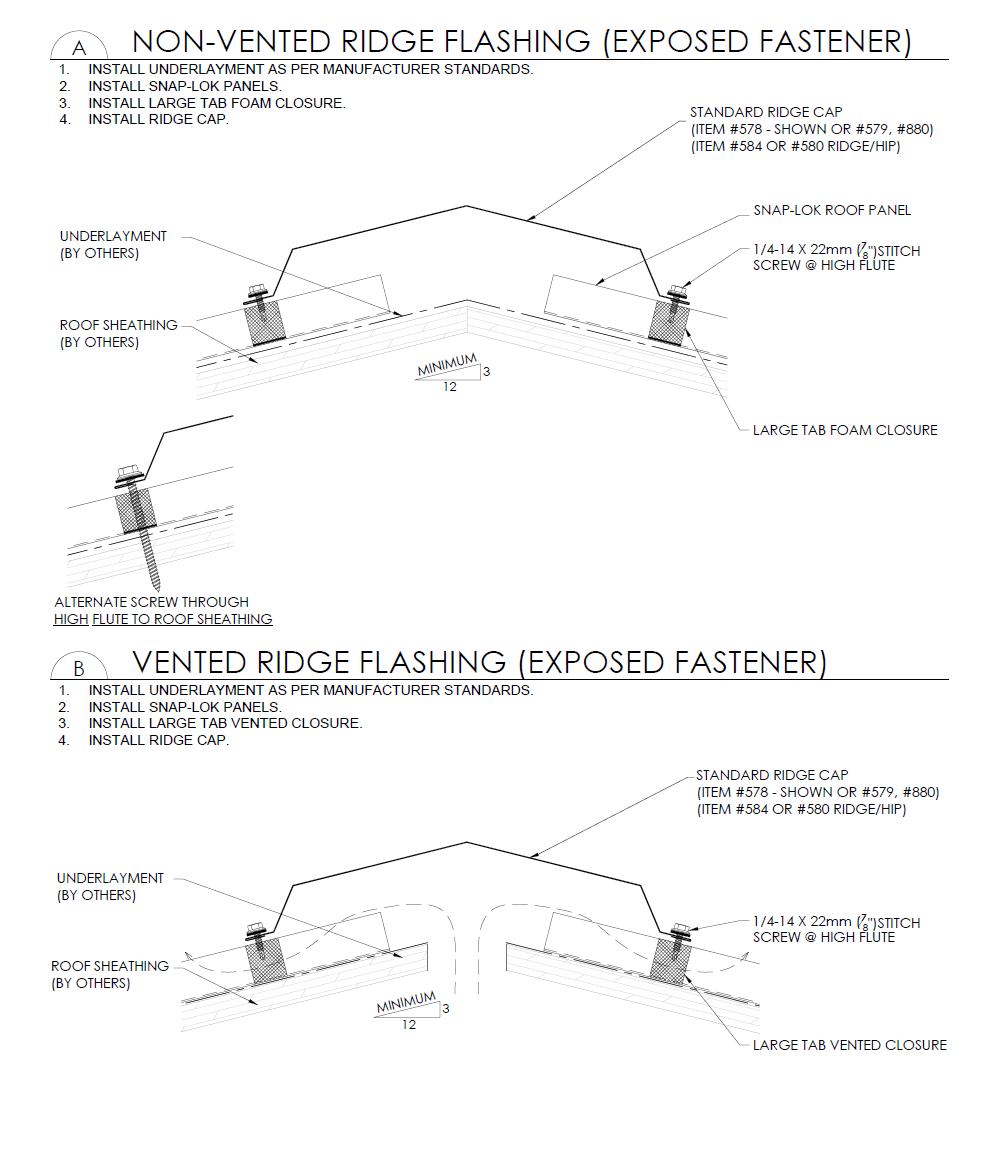
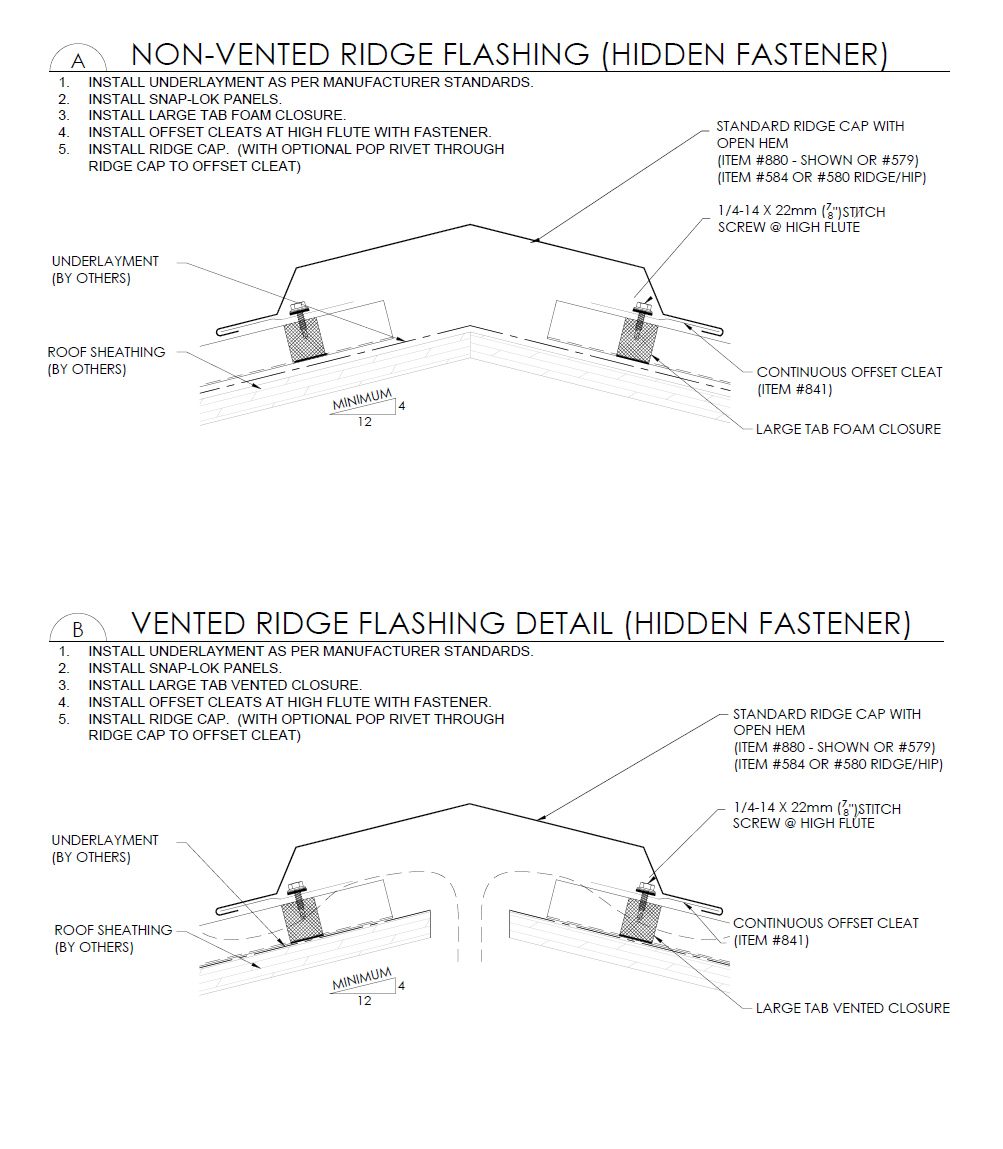
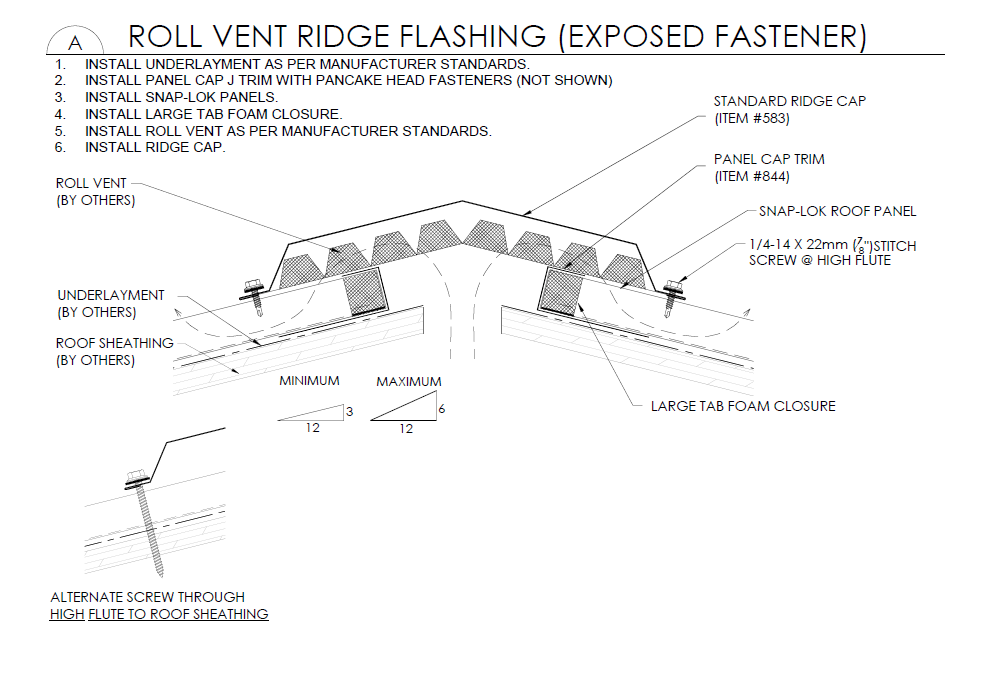
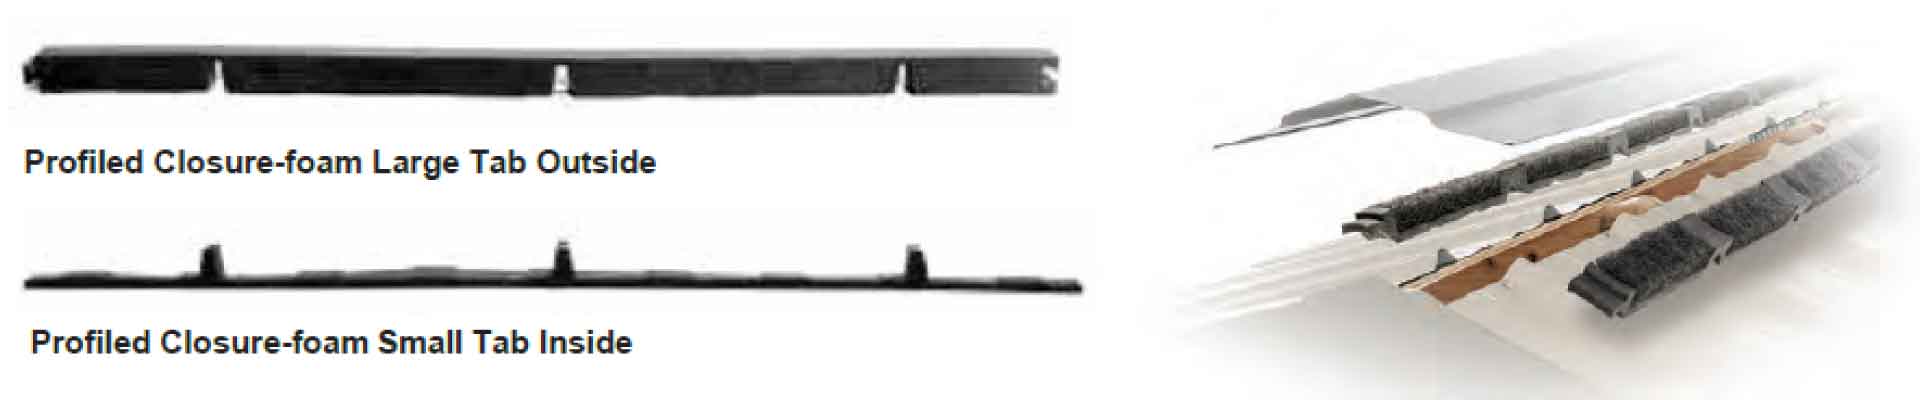
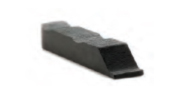
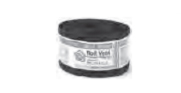
Closures - Foam and Vented
To complete the metal roof installation, closures are used to provide either a weather seal or ventilation. Foam closures and expandable tapes provide weather tight seal at eaves, hips, transitions, side/end walls and valleys. Vented closures provide Net Free Area for vented ridge caps. Large Tab closures are placed on top the of the panels and Small Tabs are installed under the panels. Profiled closures have a self-adhesive backing to ensure they remain in place. All closures are protected against UV damage, will not shrink or crack and are backed by a manufacturer's 40-year warranty:
 |
556336-12 Closure-foam Large Tab Outside 12" Snap Lok (36" covers 3 Panels) 556337-12 Closure-foam Small Tab Inside 12" Snap Lok (36" covers 3 Panels) 556336-16 Closure-foam Large Tab Outside 16" Snap Lok (32" covers 2 Panels) 556337-16 Closure-foam Small Tab Inside 16" Snap Lok (32" covers 2 Panels) |
 |
VCSL12 Vented Closure - Snap Lok 12” Panel (36” covers 3 Panels) VCSL16 Vented Closure - Snap Lok 16” Panel (32” covers 2 Panels) |
|
CRV Roll Vent 10-1/2” x 20’ Rolls - (For use with #583, #578 & #579 Ridge Caps) |
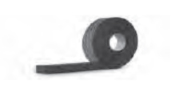 |
AST3875 3/8” x 3/4” x 13’ Rolls - AST Hi Acrylic (expands to 1 ½”) AST1475 1/4” x 3/4” x 20’ Rolls - AST Hi Acrylic (expands to 1”) |
Residential Wood Framed Installation
Installation
Westman Steel Snap-Lok panels are designed for installation over solid substrates typically used in the construction of residential roof decks. Panels are attached to CSA Standard exterior grade wood sheathing acceptable to local building codes based on project location, building category and design loads. Roofs with high wind or snow loads may require a minimum of 16mm (5/8") Plywood. If 12.7mm (1/2") Plywood or 11mm (7/16") OSB is acceptable for design loads, then fastener pull out strength must be checked with fastener manufacturer for correct use based on application.
It is the installers responsibility to ensure the correct sheathing and applicable fasteners are suitable of intended use and design loads prior to installation.
For installations over strapping with polyiso rigid insulation, including hybrid systems, contact Westman Steel for additional information.
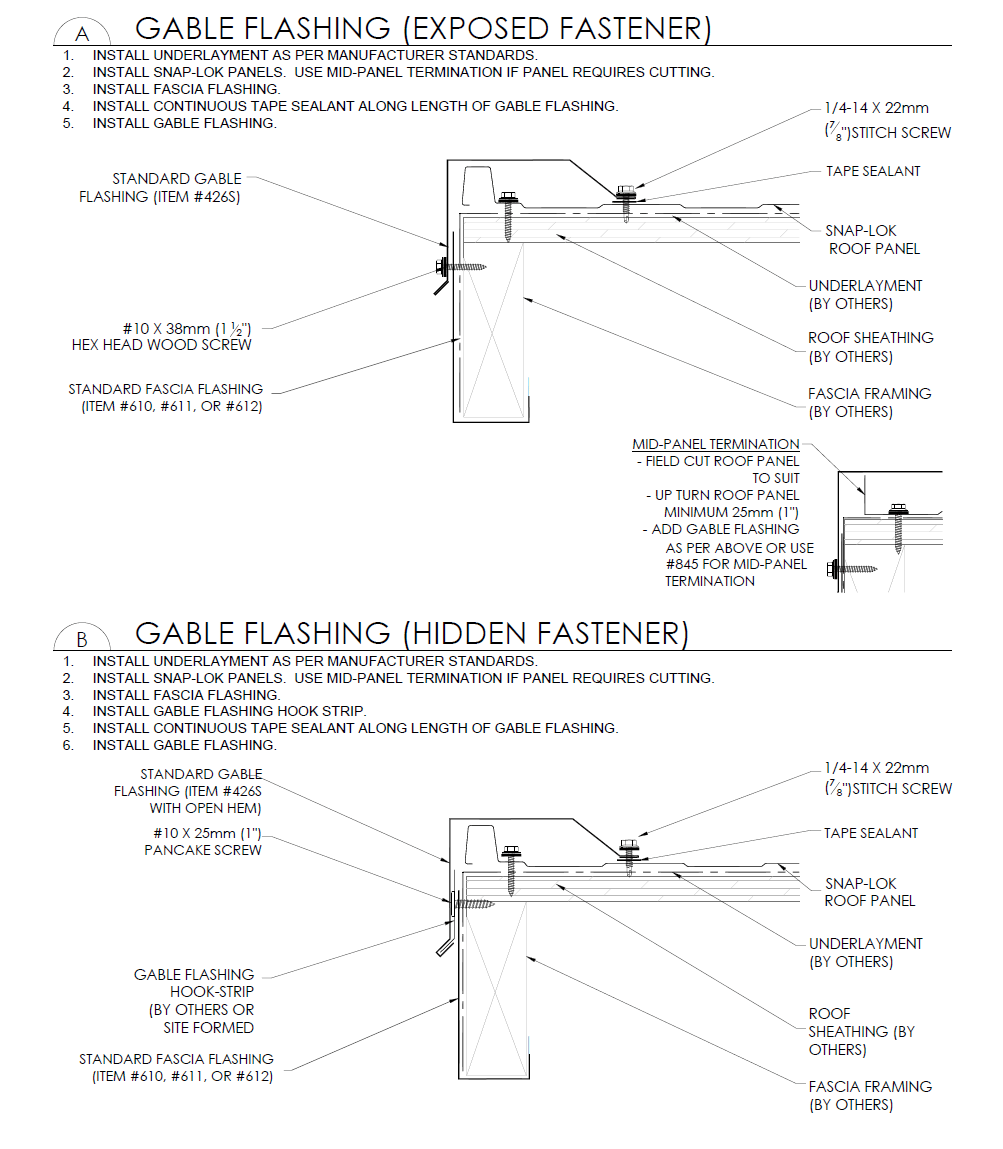
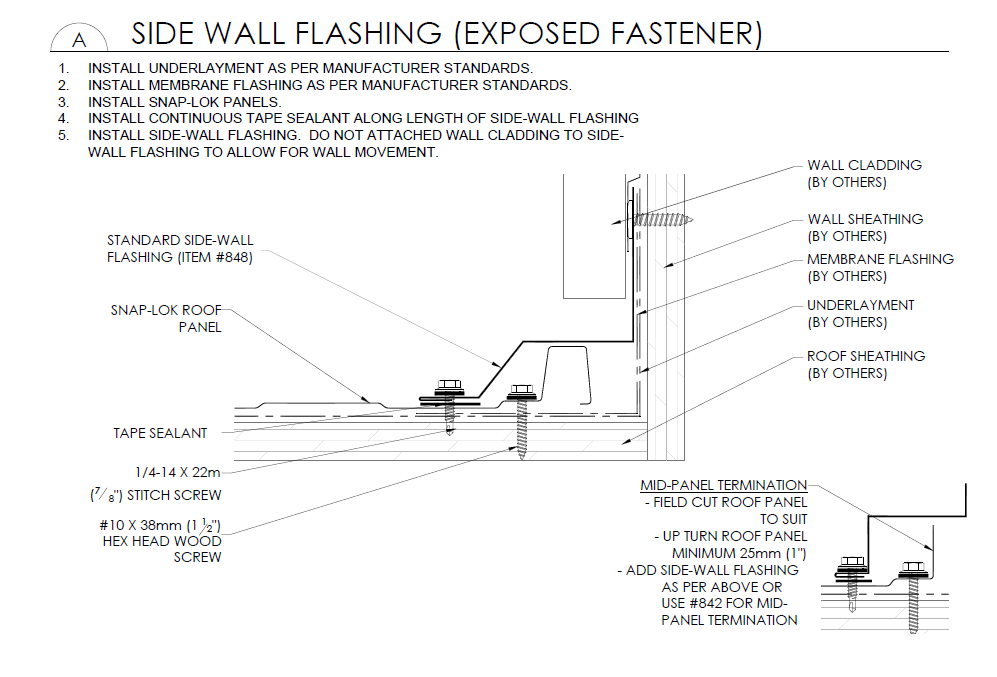
Snap-Lok panels can be installed as an exposed fastened or hidden fastened eaves and/or rake and valley system. The details contained within this guide show general details for both methods of installation. It is up to the the installer and homeowner to determine which method to use based on installation experience and roof design.
Snap-Lok panels are used as a water shedding (hydrokinetic system by means of the roof slope acting to shed water and snow. Snap-Lok roof panels recommended to be applied on a minimum roof pitch of 3:12 or greater for exposed fastened roofs. For hidden fastened trims & flashing details, minimum roof pitch of 4:12 or greater is recommended for capillary action with rain at eaves. When using hidden fastened trims & flashings, consideration must be taken for areas with high wind loads, as these connection details may not be suitable for all areas.
Installation consists of the following steps:
- Accurately measure the roof, and create a roof plan for estimating and ordering roof panels and accessories
- Ensure all required roof penetrations are in place before beginning (plumbing vents, exhaust, attic venting, etc.)
- Remove any dirt or debris from the roof surface
- Make sure there are no nails or other objects protruding from the roof that may puncture the new underlayment or damage the new roof panels
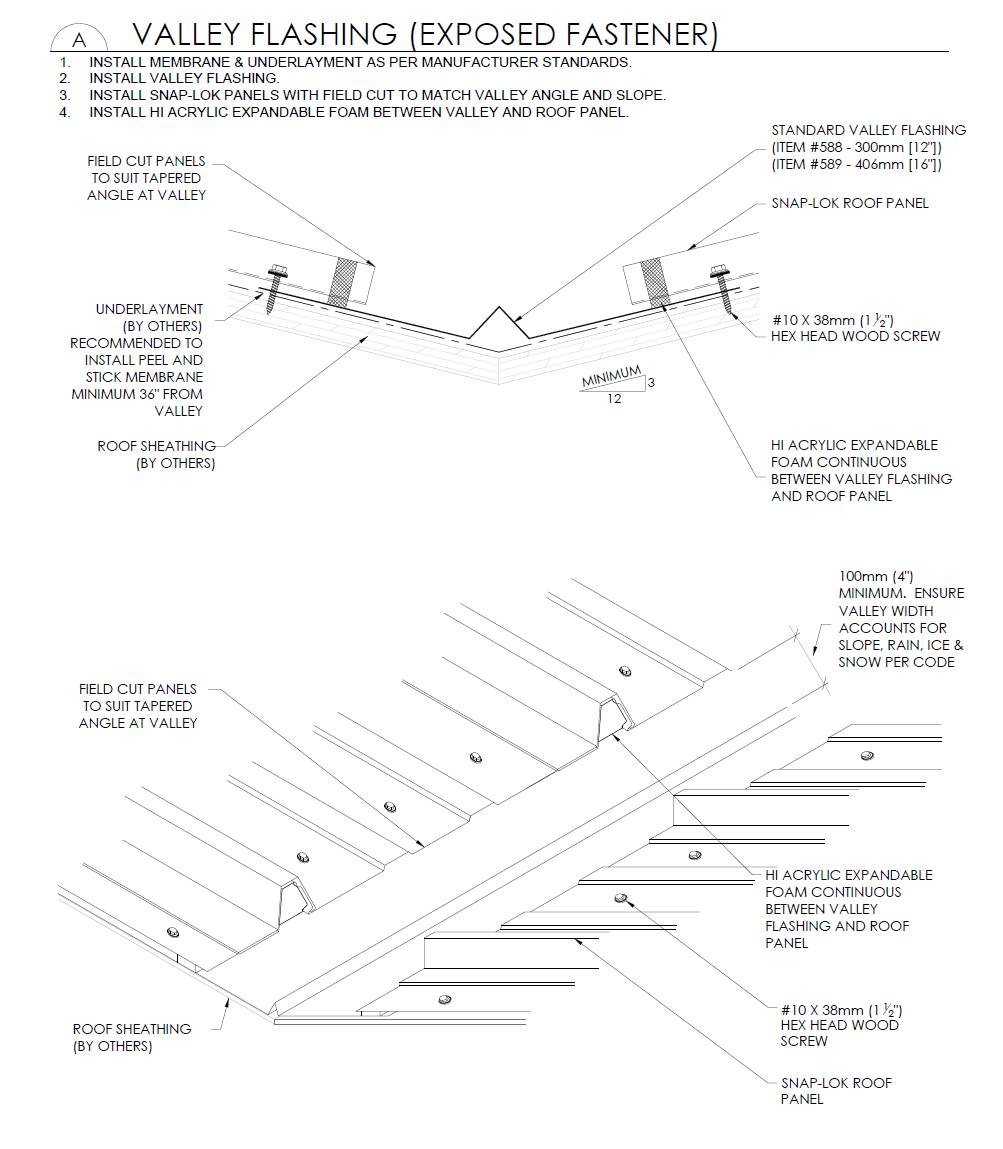
- Install Ice & Water shield at eaves a minimum distance of 36” upslope of the exterior wall, and valleys with one 36” roll centered with the valley. Check with local building codes for specific requirements. Also, install ice & water shield at any penetrations or skylights
- Install Westman Steel Underlayment
- Install fascia and eave trims and valley flashings (refer to attached details)
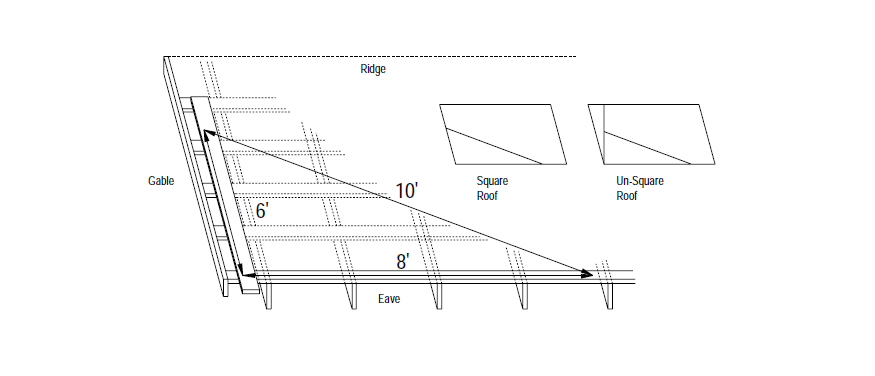
- Check the roof squareness and panel layout for possible penetration locations. Check and mark the centre location and adjust to provide a balanced visual look on both sides of the slope.
- Align the first roof panel 1/4" from the gable roof edge. Check for squareness and the proper panel overhang at the eave which will depend on the desired trim.
- Fasten the first panel with the appropriate fasteners
- Install the next panel loosely, checking alignment with the roof. If the panel is correctly aligned, engage the locking edge of the panels to the adjacent panel. Fasten the panel with the appropriate fasteners
- Continue with panel installation, periodically checking alignment and squareness and making adjustments as necessary
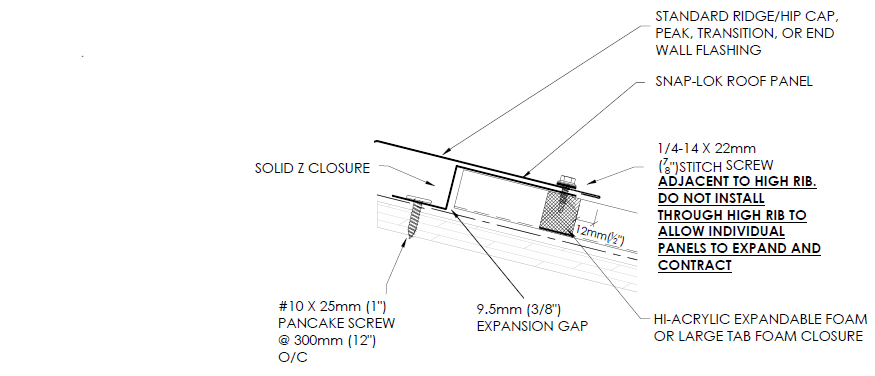
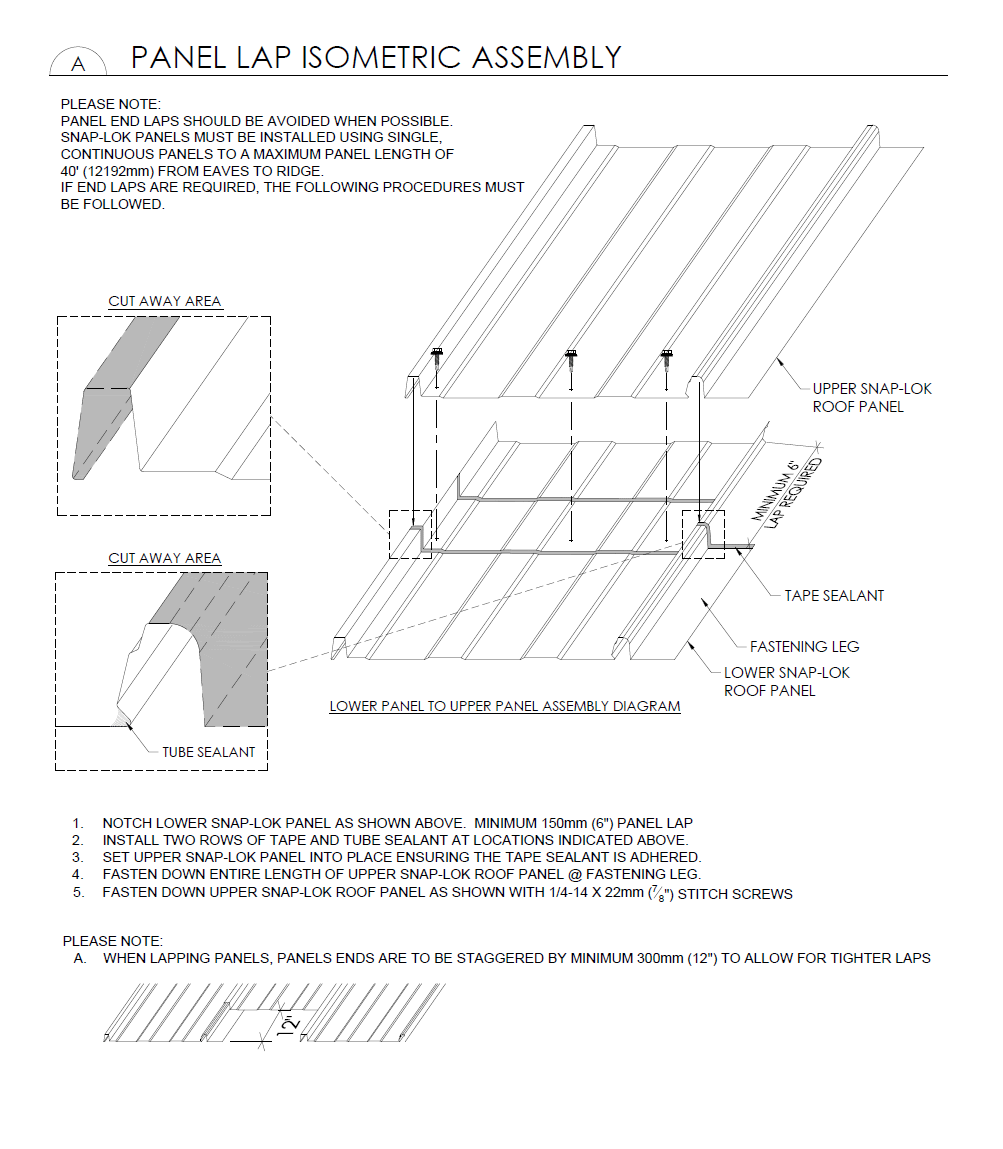
- For panels close to 40ft in length, or panels with end laps (see page 29 Panel Lap) it is recommended to use a Solid Z Closure with a 9.5mm (3/8") gap for expansion. Flashings are attached to Z Closure with #14 Stitch Screw installed adjacent to the panels high rib. Installing into the panels high rib will not allow long length panels to expand and may cause distortion. Do not use Z Closures with Offset Cleat and hidden fastened details.
- For vented areas that require a Solid Z Closure, it is recommended to source a perforated Z Closure that allows adequate air flow.