Introduction
Clean 16 Liner is a wide, glossy-finish, extruded PVC panel with interlocking tongue and groove joints along each panel edge. It provides a superior aesthetic and easy-to-maintain wall and ceiling finish. Trim accessories are available for perimeter conditions, edges of openings and panel joints to accommodate all of your project requirements. We have made this installation guide available to provide guidelines which should be followed to achieve the most successful construction for your project. The Westman Steel team is always available to answer any questions that may arise and your feedback on this document and any part of your Clean 16+ experience would be gratefully received.
Start Here:
Please read this guide completely before commencing installation.
Follow all of the recommended fastening and installation procedures.
Note that improper installation of Clean 16 may cause buckling and permanent damage to the products, which will void any warranty. The purchaser is solely responsible for determining the suitability for use or application of Clean 16 Liner and all components there of. The purchaser is also responsible for determining if materials meet all requirements of applicable local building and safety codes for specific applications. The purchaser is solely responsible for ensuring that selected fasteners and any support structure (e.g. timber frame, masonry walls etc) receiving these fasteners, are structurally adequate for their purpose in fixing the panels in place, for the required duration of their use. Improper handling, storage or installation of Clean 16 may void warranty agreements.
Cutting
Clean16 PVC interlocking panels can be cut with common power or manual tools depending on the type of cut. We recommend using a circular saw with a fine-toothed blade. For cutouts such as electrical boxes, a jigsaw is recommended.
- Before cutting, clamp the panel to the work surface to avoid vibration.
- Use a fine-tooth blade (12 to 16 teeth per inch) designed to cut plastic.
- Install the blade in the reverse direction.
- Move the saw at a slow advance rate to avoid chipping or cracking.
- Clean panels of any debris before installing.
Note: For all cutouts, first drill a hole in a corner of the opening. Then, insert the jigsaw blade into the hole and cut along the marked lines of the opening.
Wall Only Installation
Clean16 PVC interlocking panels can be installed on walls with the panel’s running perpendicular or parallel to the main supports. For sloped applications, panels should run with the slope.
Before you start your installation, determine if your PVC application is in a wet environment or a controlled (non-wet) environment.
Wet Environment
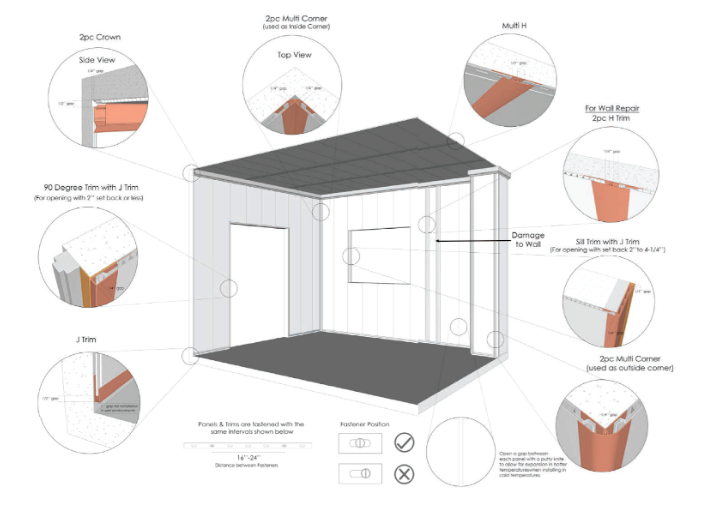
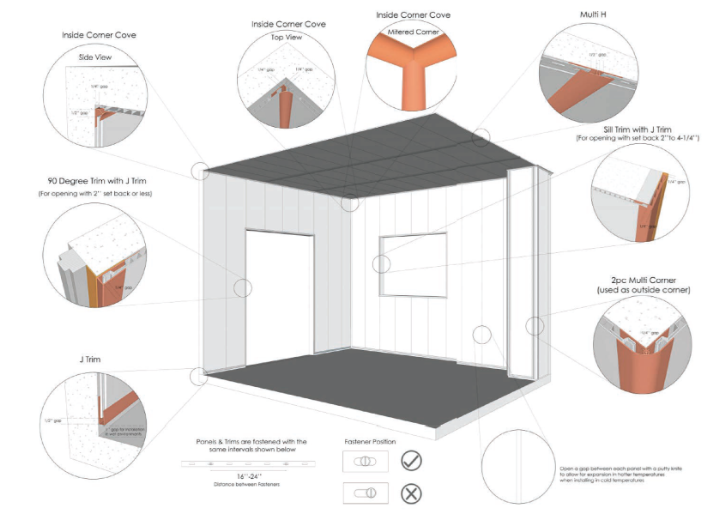
- Install the Multi-Corner trim piece for the inside corners first. Take the trim to the top of the wall and 1” (25mm) up off the floor.
- If the PVC wall panels are being installed in a wet environment such as a car wash, the bottom J-Trim piece needs to be installed next.
- Before installing the J-Trim, make sure to drill a ¼” (6mm) hole in the bottom of the J-Trim piece at 16” (400mm) on center for water drainage (Pictures A & B). This is especially important if the walls will be washed with a power washer.
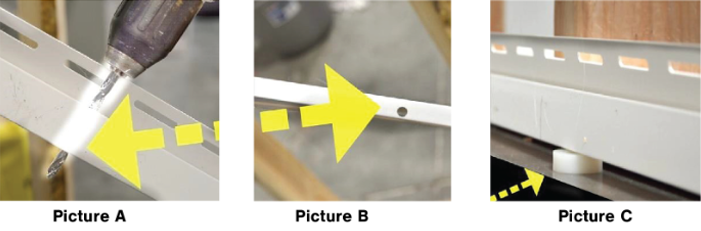
- Before installing panels, run a chalk line all around the bottom of the floor about 1” (25mm) off the floor or use plastic spacers to create the necessary gap off the floor (Picture C).
- Install trims at a maximum of 12” (300mm) centerline between screws.
- Jump to Wall Installation Continued (page 7).
Controlled Environment
Below is a recommended fastener hardware guide for typical Clean16
PVC interlocking applications.
- Wood – #8 x 1¼” Square Truss Head.
- Metal – #8 x 1¼” Square Pan Head.
- Concrete – #11 x 1¼” Tapcon.
Wall Installation Continued (Wet and Controlled Environment)
- Install the J-Trim pieces around the top of the wall at whatever height the PVC wall panel will be installed. At each corner, cut back the face of the J-Trim the same as the bottom J-Trim
- Make sure to account for expansion with J-Trim!
- If the PVC wall panel is not going to the ceiling, then install the J-Trim ½” (12mm) above the height of the panel to allow for panel expansion.
- If the PVC wall panel is going to the ceiling, make sure the panel is cut ½” (12mm) shorter than the wall height for panel expansion.
- It is important to do a physical layout of as it may be beneficial to have a panel seam at an obstruction or pipe penetration.
- If the seam does not meet an obstruction, measure the total distance and deduct the width of the panels being used so that you do not end up with a small sliver of a panel at one end. (Determine whether you have a 12” (300mm), 16” (400mm) or 18” (450mm) panel.)
- If you need to cut the first panel after you pre-mea sure, start with the panel in the corner. The cut end should go inside the Multi-Corner and in the bottom track of the J-Trim piece.
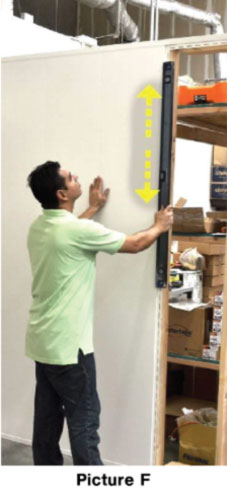
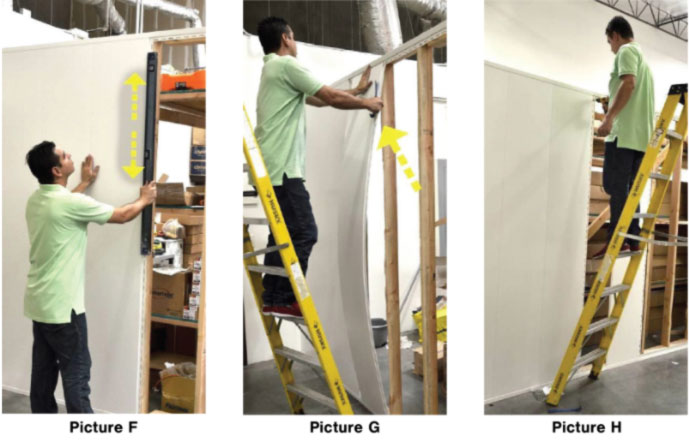
- Use a level to vertically plumb the first panel (Picture F). This should be done before installing each PVC panel.
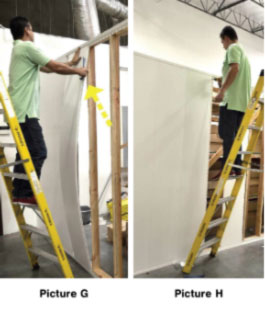
- You will need to “bow” the panel slightly to get it into the top J-Trim piece (Picture G).
- Continue to install the balance of the panels with a 24” (600mm) centerline between screws. The top and bottom screw should start at 12” (300mm) (Picture H).
- If installing in a concrete or block wall, pre-drill with a rotary hammer drill. A battery drill works well to screw the Tapcon screws.
- The last panel may need to be inserted into the slot of the Multi-Corner trim with a sheet rock putty knife. Make sure the last panel is cut ¼” (6mm) less than the opening width to allow for panel expansion.
- If you are mounting a heavy object to the wall such as an electrical box, use plastic spacers to prevent the panel from being crushed if the screws are overtightened.
- The spacer is just a little thicker than the panel. Drill a 1” (25mm) hole into the panel and insert the spacer into the hole.
- The inner hole of the spacer can now receive any bolt or screw up to ½” (12mm) in diameter. This will keep the heavy object from hitting the PVC wall panel.
Note: Account for expansion when installing in cold temperatures, ensure you have the correct stainless steel screw for the substructure. Make sure to open the gap between each panel with a sheetrock putty knife to allow for expansion in hotter temperatures.
Ceiling and Wall Installation
Clean16 PVC interlocking panels can be installed on walls and ceilings with the panels running perpendicular or parallel to the main supports. For sloped applications, panels should run with the slope.
Wet Environment
- If the PVC wall panels are being installed in a wet environment such as a car wash, the bottom J-Trim piece needs to be installed first.
- Before installing the J-Trim, make sure to drill a ¼” (6mm) hole in the bottom of the J-Trim piece at 16” (400mm) on center for water drainage. This is especially important if the walls will be washed with a power washer (see images A & B).
- Before installing panels, run a chalk line all around the bottom of the floor about 1” (25mm) off the floor or use plastic spacers to create the necessary gap off the floor (Picture C).
- Install trims at a maximum of 12” (300mm) centerline between screws.
- Jump to Ceiling and Wall Installation Continued (page 9).
Controlled Environment
- If the PVC wall panels are installed in a controlled environment (non-wet), then the J-Trim piece can be installed directly to the floor and no drain holes are required.
- Jump to Ceiling and Wall Installation Continued (page 9).
Ceiling and Wall Installation Continued
Ceiling Installation
- Before beginning installation, it is important to determine the direction of the Clean16 PVC ceiling panels first.
- If the panels are running the length of the room and perpendicular to the trusses, make sure to use Multi-H Trims to join the panel lengths together.
- If both the panels and joists are running the width of the room, a sub-frame needs to be installed at 24” (600mm) in center. After the sub frame is completed, proceed to install the PVC ceiling panels as indicated in Picture I.
- Start at one end and clip the PVC panel into the Multi-Corner.
- If installed in cold weather, make sure to cut back the PVC ceiling panel a ½” (12mm) to create a gap for panel expansion.
- Fasten to the joists at a minimum of every 24” (600mm) centerline. If you do not hit a joist, add a piece of wood blocking at the end of the PVC panel so the Multi-H Trim has a fastening point.
- Continue with these steps until the last panel. The last panel will need to be cut a ½” (12mm) smaller to create a gap for it to slide into the Multi-Corner.
Wall Installation
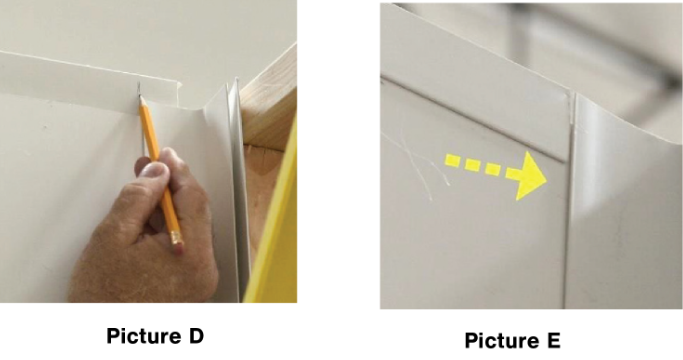
- At each corner, insert the wall panels into the track of the Multi-Corner. Cut back the face of the bottom J-Trim piece (Pictures D & E).
- If the PVC wall panel is going to the ceiling, make sure the panel is cut ½” (12mm) shorter than the wall height for panel expansion.
- It is important to do a physical layout as it may be beneficial to have a panel seam at an obstruction or pipe penetration.
- If the seam does not meet an obstruction, measure the total distance and deduct the width of the panels being used so that you do not end up with a small sliver of a panel at one end. (Determine whether you have a 12” (300mm), 16” (400mm) or 18” (450mm) PVC panel.)
- If you need to cut the first panel after you pre-measure, start with the panel in the corner. The cut end should go inside the Multi-Corner and in the bottom track of the J-Trim piece.
- Use a level to vertically plumb the first panel (Picture F). This should be done before installing each PVC panel.
- You will need to “bow” the panel slightly to get it into the top J-Trim piece (Picture G).
- Continue to install the balance of the panels with a 24” (600mm) centerline between screws. The top and bottom screws should start at 12” (300mm) (Picture H).
- If installing in a concrete or block wall, pre-drill with a rotary hammer drill. A battery drill works well to screw the Tapcon screws.
- The last panel may need to be inserted into the slot of the Multi-Corner trim with a sheetrock putty knife. Make sure the last panel is cut ¼” (6mm) less than the opening width to allow for panel expansion.
- If you are mounting a heavy object to the wall such as an electrical box, use plastic spacers to prevent the panel from being crushed if the screws are overtightened.
- The spacer is just a little thicker than the panel. Drill a 1” (25mm) hole into the panel and insert the spacer into the hole.
- The inner hole of the spacer can now receive any bolt or screw up to ½” (12mm) in diameter. This will keep the heavy object from hitting the PVC wall panel.
Note: Account for expansion when installing in cold temperatures, ensure you have the correct stainless steel screw for the substructure. Make sure to open the gap between each panel with a sheetrock putty knife to allow for expansion in hotter temperatures.
Regular Installation Method
- Install the PVC ceiling panels without any trim at the junction of the ceiling and wall.
- If panels are installed in cold weather, make sure to follow recommended clearances for panel expansion.
- After installation of the ceiling panels, install the J-Trim piece based on the method of whether the J -Trim goes all the way to the floor or not.
- Once all the PVC wall panels are installed (as per Wall Only Installation) go back and install the Crown-Base and Crown-Cap.
- Pre-measure and miter cut each corner with the base and cap installed together (Picture J). Install the Crown-Base first and ensure the screw is fastened in the track (Picture K). This will allow the flex piece to not have any bulges.
- Slip in the Crown-Cap to cover up all the screws.
Food Safe Environment Installation Method
If it is a food-safe environment, use the Multi-Corner trim piece for the wall-to-ceiling transition.
- Make sure to install the Multi-Corner around the perimeter of the wall-to-ceiling joint first.
- The wall or ceiling PVC panels can be installed next.
- Jump to Wall and Ceiling Installation (page 8).
Note: If it’s not a food-safe environment, you will need to use a 2-piece Crown Trim for the wall-to-ceiling transition. Jump to Wall and Ceiling Installation steps (page 8).
Trim Installation
Standard Installation
Food Safe Installation
Cleaning
Regular cleaning of Clean16 PVC will help prolong the life of the panels. Use of incompatible cleaning products can cause structural and/or surface damage.
- To remove common dirt, hand wash with a soft cloth or sponge and a mild cleaning solution.
- Regular rinsing of panels with clean lukewarm water is sufficient in dry areas.
- For hard-to-clean areas, a small- to mid-sized power washer may be used. Keep the nozzle 4-6 feet away from the wall and use a wide spray to distribute water pressure.
Note: Abrasive cleaning agents or pads should never be used as they may scratch the panel’s surface.
Additional Information
If additional technical or installation information is needed, please contact Westman Steel International. If you have a specific question about requirements in your region, contact your local code office or building inspector.
Drawings and technical reports are provided for reference only. Drawings are not project-specific and are for product representation only. Actual products may vary. These drawings are the property of Westman Steel International and are to be used solely as a representation of Westman Steel products. These designs may not be recreated or produced without the expressed, written consent of Westman Steel.
All information, recommendations, or advice given by Westman Steel International employees or partners, written or oral, is given in good faith and is thought to be accurate and current. It is the responsibility of each product user to ensure the product is used in compliance with current environmental and legal requirements specific to each product application. Westman Steel International and its partners will not be held liable for incorrect or improper use of its products.
Westman Steel HEREBY DISCLAIMS ANY WARRANTIES, EXPRESS OR IMPLIED, INCLUDING IMPLIED WARRANTY OF MERCHANTABILITY AND/OR IMPLIED WARRANTY OF FITNESS FOR A PARTICULAR PURPOSE. Westman Steel SHALL NOT BE LIABLE FOR ANY INCIDENTAL, CONSEQUENTIAL, OR PUNITIVE DAMAGES.